Create an event model tutorial
Create an event model that represents the design of your event-driven system. This tutorial walks you through the various input methods with which you can build your event model. Its purpose is to get you familiar with the mechanics of modeling on the oNote canvas, rather than modeling for a specific use case. You can mix and match these input methods as you prefer.
| If you are using the free oNote Starter subscription, you are limited to a maximum of five models. Upgrade to a paid subscription plan to add unlimited event models. You can also delete any models you no longer need. |
Add a model name
-
Under Event Models in the left menu, click + Add New to add a new model.
-
(Required) Enter a unique Name for your model.
-
(Optional) Enter a Description of your model.
-
Click Save.
The model name displays in the list of models and opens in the modeling canvas.
At this point, you could import an existing model at a cursor location.
-
Smart cursor mode model example
This example steps you through modeling using keyboard shortcuts and the smart cursor mode. The smart cursor mode is activated when you press Ctrl+Enter after naming a model object. With this method, your cursor predicts the next lane location and automatically links objects. This method is recommended for those new to event modeling, or those who want to quickly build a standard model foundation.
| If you forget to press Ctrl+Enter and press just Enter instead after naming an object, the smart cursor mode is deactivated for the current pattern. You can activate it again with your next contiguous pattern sequence. |
-
In the Default Audience lane, press Enter.
-
Type a Name for the interface object, such as
Interface, and press Ctrl+Enter.The cursor focus jumps down to the Timeline lane and opens an object box for a command.
-
Type a Name for the command object, such as
Command, and press Ctrl+Enter.The cursor focus jumps down to the Default Stream lane and opens an object box for an event.
-
Type a Name for the event, such as
Event, and press Ctrl+Enter.The cursor focus jumps back up to the Timelane lane and opens an object box for a read model.
-
Type a Name for the read model, such as
Read model, and press Ctrl+Enter.The cursor focus jumps back up to the Default Audience lane and opens an object box for another interface object.
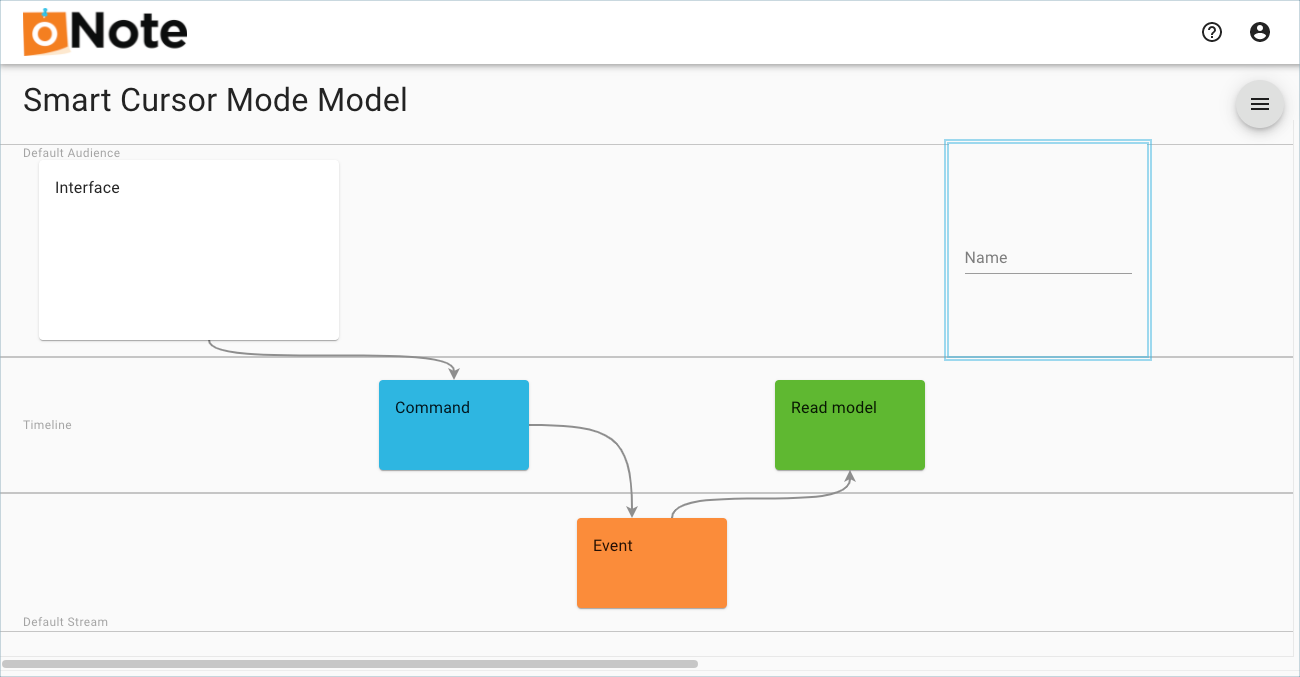 Example model using smart cursor mode
Manual cursor mode model example
This example steps you through creating a small model slice using keyboard shortcuts without using smart cursor mode. With this method, you have to manually move your cursor and make links between objects. You also have to choose which object you want to create in the Timeline lane: command or read model (view).
-
In the Default Audience lane, press Enter.
-
Type a Name for the interface object, such as
Interface, and press Enter. -
Move your cursor down to the Timeline lane using your keyboard arrow keys or other supported keyboard shortcuts.
-
Press Enter and type a name the command object, such as
Command. -
You are prompted to choose an option. Choose Insert New Command.
-
Move your cursor focus down to the Default Stream lane and press Enter.
-
Type a Name for the event, such as
Event, and press Enter. -
Move your cursor back up to the Timeline lane and press Enter.
-
You are prompted to choose an option. Choose Insert New Read Model.
-
Click and drag the model objects for ideal placement.
-
Make links between the objects. See linking to objects.
Right-click menu model example
This example steps you through modeling using the right-click context menus. With this method, you have to manually move your cursor and make links between objects. Use this method if you prefer or if you are unfamiliar with the available keyboard shortcuts.
-
In the Default Audience lane, right-click and choose Add Interface from the context menu.
-
Type a Name for the interface object, such as
Interface, and press Enter. -
In the Timeline lane, right-click and choose Add Command from the context menu.
-
Type a Name for the command object, such as
Command, and press Enter. -
In the Default Stream lane, right-click and choose Add Event from the context menu.
-
Type a Name for the event, such as
Event, and press Enter. -
In the Timeline lane, right-click and choose Add Read Model from the context menu.
-
Type a Name for the read model, such as
Read model, and press Enter. -
Click and drag the model objects for ideal placement.
-
Make links between the objects. See linking to objects.